Quantcast
Channel: Blog – Winaero
Viewing all 3784 articles
Browse latest View live

Windows 8 RTM – free 90 days trial

$
0
0

In case you have been living under a rock, surely you must have read about Windows 8. It was released to manufacturing around 15 days ago and is now available for MSDN/TechNet subscribers. In case you don’t have a subscription, you can download and evaluate the free Windows 8 Enterprise Edition for 3 months. Microsoft has released an absolutely free 90-day trial version of Windows 8 RTM to the public. It is a good opportunity to try the brand new OS if you were unable to test it early on.

Here is something you have to know:

System requirements for Windows 8

  1. Processor: minimum 1 GHz with NX/XD bit support.
    NX stands for No eXecute and is a technology used in processors to prevent execution of certain types of code. NX was originally invented by AMD. XD stands for eXecute Disable, the same thing developed by Intel.
  2. RAM: 1 GB (32-bit) or 2 GB (64-bit)
  3. Hard disk space: minimum 20GB
  4. Graphics: Microsoft DirectX 9 graphics device with WDDM 1.0 driver at least
  5. Display: Minimum 1024×768 screen resolution

There is not much difference between the RTM build and the Release Preview of Windows 8. I have noticed a new theme, Start screen backgrounds, new lock screen images, wallpapers and a crippled Desktop Window Manager with disabled Glass. And maybe, RTM includes bug fixes and performance improvements.

How to obtain your free trial copy of Windows 8

You need a “Microsoft Account”, formerly known as “Live ID”. Use the following links to sign in and download:

How to disable the edge panels (Charms Bar and Switcher) in Windows 8

$
0
0

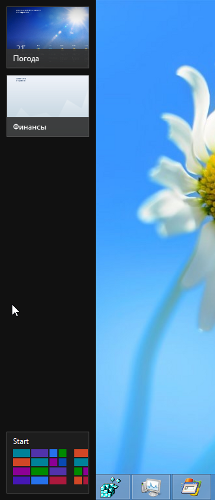
Windows 8 has introduced the new “Modern UI”, formerly known as Metro. The Start Menu was replaced with the brand new Start screen feature which splits the Windows UX into two separate worlds – world of Metro apps and the Classic Desktop. To switch between these two environments, Windows 8 offers two panels at the top left and top right edges of screen which are the Switcher and the Charms Bar.

The Charms Bar provides quick access to the following Charms: Search, Share, Start Screen, Devices and Settings:

The Charms bar appears when you move your mouse pointer to the top-right corner or bottom-right corner of the screen.

Switcher provides an easy way to switch between running Modern/Metro apps and the Desktop. Like the Charms Bar, it automatically appears on the screen as soon as you move your mouse to the top-left corner of the screen.

Both Switcher and Charms Bar are parts of Windows 8 Edge UI.

If you don’t use the Modern UI and work mostly at the Classic desktop, you may find the Charms Bar and Switcher a bit annoying. In my case, they always accidentally appear when I am trying to close the window or access its menu. So I am going to share with you two simple tweaks which allow you to change the behavior of Edge UI. After applying these tweaks, the Edge UI panels will not appear when you move your mouse to the top left / top right corners. This does not mean that Switcher and Charms Bar will be completely disabled. You will still be able to show them using keyboard shortcuts.

The “Win+Tab” hotkey shows Switcher whereas the “Win+C” hotkey shows the Charms Bar.

How to disable the Edge UI panels aka Charms Bar and Switcher in Windows 8

  1. Open Registry Editor (press Win+R, type regedit.exe in Run dialog and press Enter) and go to key
    HKEY_CURRENT_USER\Software\Microsoft\Windows\CurrentVersion\ImmersiveShell
  2. Create here a new key “EdgeUI“.
  3. Select the EdgeUI key in the left pane and create two new DWORD values in the right pane of Registry Editor.
    • DisableTLcorner – stands for “Disable Top-Left corner”. Set it to 1, and Switcher will not appear when you move your mouse to the top-left corner of the screen. Note that it will still appear if you move the pointer to the bottom-left corner and then move it upwards along the left edge of the screen.
    • DisableCharmsHint – Set it to 1 to disable the Charms bar when using the mouse. It will not appear when you move the pointer to the top-right or bottom-rights corners. But as above, if you move the pointer to the top-right corner and then move it down along the right edge of the screen (or from the bottom-right corner up to the screen center along the right edge), it’ll appear again.
      So, both settings prevent the Edge UI panels from appearing accidentally. They will take effect immediately -  you do not need to restart Windows Explorer or log off. You will still be able to show them when you actually want to use them.

If you want to enable the default behavior of Switcher, simply set DisableTLcorner value to 0 or delete it. Same goes for DisableCharmsHint value – set it to 0 or delete it to enable the Charms Bar popup.

For those who prefer ready-made registry files:

Download Edge UI Tweaks

How to jump to the desired registry key with one click

$
0
0

If you are addicted to various registry tweaks like I am, you probably work with the Registry Editor very often. Various websites related to tweaking instruct you to go to different registry keys. I would like to share my own way to jump to the desired registry key directly and skip manual navigation with the Registry Editor. This can be done with a simple VB script file without using third-party software. Click “Read more” if you are interested.

Overview

Since Windows 2000, the Registry Editor is able to remember the last opened key before you closed it. This data is stored at the following registry key:

HKEY_Current_User\Software\Microsoft\Windows\CurrentVersion\Applets\Regedit

The LastKey value is used by Windows to store the last used key.

As you can see, this is a per-user registry branch, so Windows stores the last used key for every user separately. It is possible to utilize this feature to directly jump to the key you need. Let me show how it can be done via Windows Scripting Host and VBScript.

The Implementation

The idea is to copy the full path of the desired registry key to the clipboard and replace the LastKey value with the copied value from the clipboard. When regedit.exe is started after doing this,  it will open directly at the key you want.

How to fetch clipboard content with VBscript

The “htmlfile” ActiveX object is used to display HTML help and HTA files in Windows. It can be used to fetch clipboard content. It does not even require IE to be installed . The code is as follows:

set objHTA=createobject("htmlfile")
cClipBoard=objHTA.parentwindow.clipboarddata.getdata("text")

If clipboard content is text, it will be stored in cClipBoard variable. Simple, isn’t it?

Directly opening Regedit at desired key

Since we now have the desired key in cClipboard, we have to write it into LastKey value metioned above. The code for that is:

Dim WshShell
Set WshShell = WScript.CreateObject("WScript.Shell")
WshShell.RegWrite "HKCU\Software\Microsoft\Windows\CurrentVersion\Applets\Regedit\LastKey", сClipBoard, "REG_SZ"

This code snippet is self-explanatory, so there is no need to comment it.

The final script looks like this:

Dim objHTA
Dim cClipBoard
Dim WshShell
set objHTA=createobject("htmlfile")
cClipBoard=objHTA.parentwindow.clipboarddata.getdata("text")
Set WshShell = WScript.CreateObject("WScript.Shell")
WshShell.RegWrite "HKCU\Software\Microsoft\Windows\CurrentVersion\Applets\Regedit\LastKey", cClipBoard, "REG_SZ"
WshShell.Run "regedit.exe -m"
Set objHTA = nothing
Set WshShell = nothing

Note that WshShell.Run “regedit.exe -m” line. It contains the undocumented ”-m” switch, which allows you to run multiple instances of  Regedit simultaneously.

I have saved this script as “RegNav.vbs” file and you can download it right now:

Download ready to use VB Script

If opening Regedit is a very frequent task for you, then you can pin regnav.vbs to the taskbar. Create a new shortcut  and type the following into the shortcut target text box:

wscript.exe d:\regnav.vbs

Don’t forget to use the correct path to regnav.vbs.

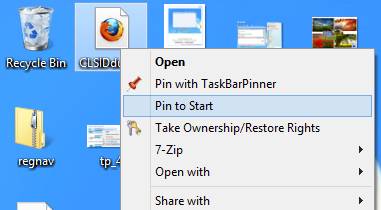
Now right click on the shortcut file you have created and click “Pin to Taskbar” from the context menu. That’s all.

P.S. How to test this script

  1. Select this text
    HKEY_LOCAL_MACHINE\SOFTWARE\Microsoft\Windows NT\CurrentVersion\Winlogon
  2. Press CTRL+C
  3. Click on regnav.vbs.

How to get desktop gadgets and sidebar back in Windows 8

$
0
0

As you may have noticed, Desktop Gadgets and Sidebar are missing in Windows 8 RTM. Personally, I don’t miss gadgets since I did not use them. But a lot of people have been missing them. If you can’t live without desktop gadgets, there is good news for you: desktop gadgets and sidebar can be made to work in Windows 8.

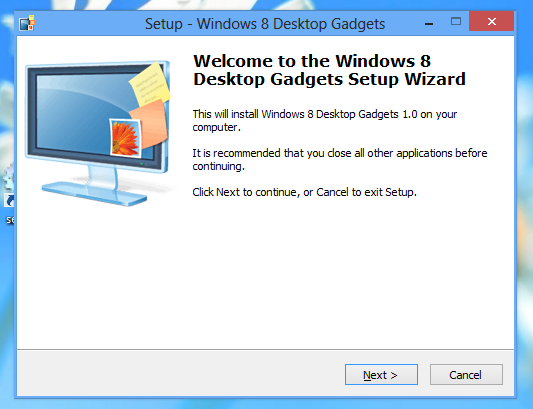
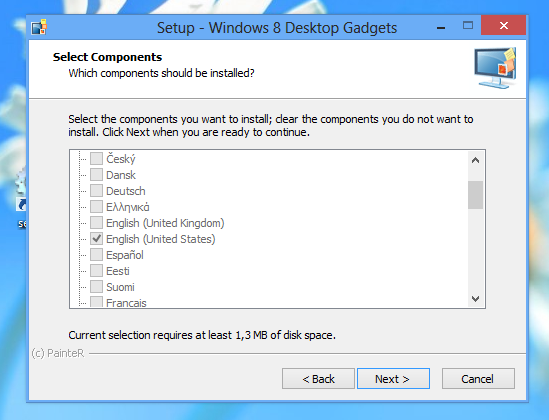
My friend PainteR has created an unofficial installer which allows you to get gadgets back in Windows 8 with just a few mouse clicks. Just follow the white rabbit setup wizard.

Note that it supports all possible Windows 8 languages,  so you will get gadgets and sidebar’s interface with your native language!

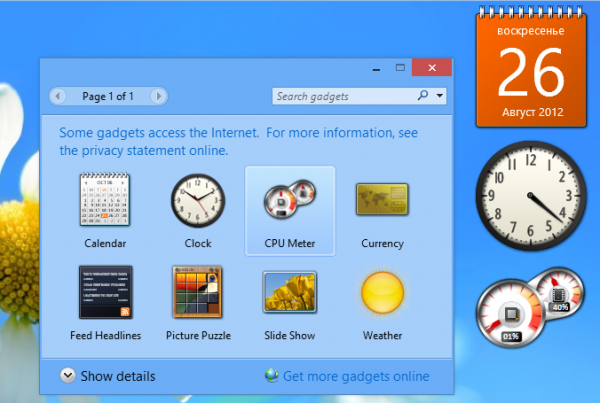
Wait for the installer to finish and right click on the desktop after that. You will see the familiar “Gadgets” item in your desktop context menu. Enjoy:

Before you download

  1. I am not sure that this is legal. Check the license agreement of Windows 7 and Windows 8 before you use this installer. I WILL NOT USE THIS ANYWAY.
  2. All credits goes to PainteR. No one from Winaero is associated with this installer.

Download Desktop Gadgets for Windows 8


How to create a shortcut to the Shut Down Windows dialog in Windows 8, Windows 7 and Vista

$
0
0

Since Windows Vista, the classic Shutdown dialog is accessible only with the help of a hotkey. You have to minimize all windows, then click to focus on the Desktop and finally press Alt+F4 to make it appear. Instead, Microsoft offers you an expandable submenu for the “Shutdown” button in the Start Menu of Windows 7 and Windows Vista. Things have changed for the worse again with Windows 8: no more Start Menu, no more quick access to Shutdown functions. Today, I going to show you how it is possible to display the familar classic Shut Down Windows dialog with a single click.

All we need is just the Notepad application. Start it and paste the following text:

dim objShell
set objShell = CreateObject("shell.application")
objshell.ShutdownWindows
set objShell = nothing

Now select File – Save menu item and type any filename, but it is necessary to add “.vbs” as the file extension.

Tip: You can add the filename and extension inside quotes, so that Notepad does not add “.txt” to the filename that you have typed. Adding it inside quotes will save it as “shutdown.vbs” and not, “shutdown.vbs.txt”. See the following image:


Now double click on the file you saved and you will see the old good Shut Down Windows dialog. That’s it.

How does it work

There is nothing magical with this trick. Windows provides users with access to a wide variety of objects necessary for running applications and managing the operating system. One of them is the Shell COM object which we have created inside the script. It has a Shutdown method which displays the Shut Down Windows dialog box. Nothing more, nothing less.

Bonus tip: How to pin our Shut Down dialog script to the Taskbar

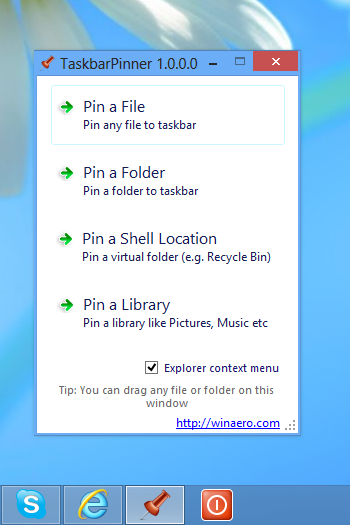
It is very easy to get it pinned with our latest software: Taskbar Pinner. Just follow the step-by step instructions below:

  1. Create a shortcut to your VBS file and place it anywhere you want.
  2. Change the icon of the shortcut you have created to the one from C:\Windows\System32\Shell32.dll file.
  3. Drag the shortcut file to Taskbar Pinner’s main window and drop it. That’s all.

    Now you can even safely remove the shortcut you have created at step 1, it is not required anymore.

Download ready-to-use VB script file

How to disable transparency for the taskbar in Windows 8

$
0
0

You might have noticed that the taskbar is always transparent in Windows 8 regardless of the windows. This will show you how to disable tranparency for the taskbar in Windows 8 with two clicks.

How to disable transparency for the taskbar in Windows 8

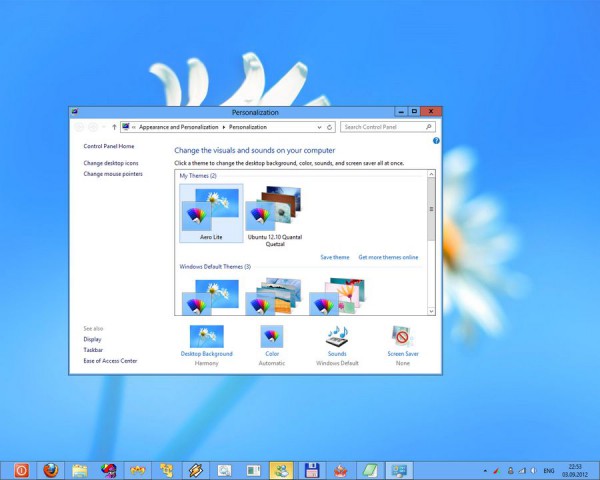
Step 1. Visit the AeroLite themepack page and download AeroLite themepack for Windows 8 RTM from there: AeroLite themepack.

Step 2. Double click on the file that you have downloaded to apply the Aero Lite theme for your Desktop.

That’s it. Your taskbar will be opaque.

Please keep in mind that Aero Lite theme comes with the several visible differences from the “regular” Aero theme. Titlebar buttons, selection boxes and many more items will be changed.

Thanks to our friend Vishal Gupta for sharing this tip.

How to restore the missing Briefcase feature in Windows 8 RTM

$
0
0

Although Windows 8 offers you several “modern” data synchronization solutions such as SkyDrive and Microsoft Account, they both are limited – they are dependent on the Internet. You may or may not know about the old “Briefcase” feature which was removed from Windows 8. It offers you simple two way data synchronization which was offline and could be used with removable drives. Someone at Microsoft decided to remove it from the brand new release of Windows ’cause he thought perhaps that the feature was too outdated. If you miss Briefcase, here is a simple solution for you.

I have figured out a way to restore the Briefcase feature with a simple registry hack. It looks as follows:

Windows Registry Editor Version 5.00

[HKEY_LOCAL_MACHINE\SOFTWARE\Classes\Briefcase\ShellNew]
"IconPath"=hex(2):25,00,53,00,79,00,73,00,74,00,65,00,6d,00,52,00,6f,00,6f,00,\
  74,00,25,00,5c,00,73,00,79,00,73,00,74,00,65,00,6d,00,33,00,32,00,5c,00,73,\
  00,79,00,6e,00,63,00,75,00,69,00,2e,00,64,00,6c,00,6c,00,2c,00,30,00,00,00
"ItemName"=hex(2):40,00,25,00,53,00,79,00,73,00,74,00,65,00,6d,00,52,00,6f,00,\
  6f,00,74,00,25,00,5c,00,73,00,79,00,73,00,74,00,65,00,6d,00,33,00,32,00,5c,\
  00,73,00,68,00,65,00,6c,00,6c,00,33,00,32,00,2e,00,64,00,6c,00,6c,00,2c,00,\
  2d,00,36,00,34,00,39,00,33,00,00,00
"Directory"=""
"Handler"="{85BBD920-42A0-1069-A2E4-08002B30309D}"

[HKEY_LOCAL_MACHINE\SOFTWARE\Classes\Briefcase\ShellNew\Config]
"IsFolder"=""
"NoExtension"=""

As you can see, there is no magic here. The main value is the missing “ShellNew” subkey at Briefcase’s file descriptor branch in the registry. All you need is to merge the following registry tweak:

Briefcase restore tweak

Merge the Windows 8-Enable Briefcase.reg file to enable Briefcase feature. Merge the Windows 8-Disable Briefcase.reg file to disable it again. Quite simple.


How to reset screenshot counter in Windows 8

$
0
0

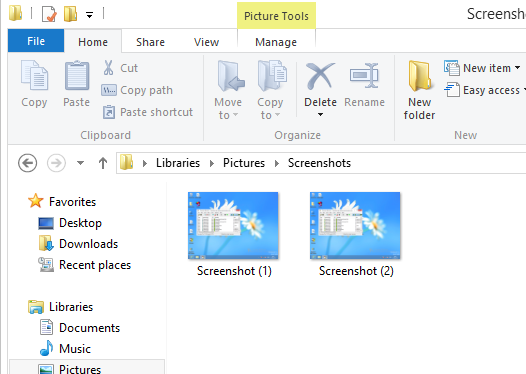
One of the really cool features of Windows 8 is the Screenshot feature. Press Win + PrintScreen and you will get a screenshot automatically saved at %userprofile%\Pictures\Screenshots. It will be named as ‘Screenshot (#).png’ where # indicates the screenshot index.

This screenshot index value is stored in the registry permanently. Even if you remove all your screenshot images, the next screenshot you take will have a higher index. Here’s how to reset the screenshot counter.

How to reset the screenshot counter in Windows 8

Step 1. Press Win+R keys on your keyboard and type regedit.exe into the “Run” dialog box. This will open Windows Registry Editor for you.

Step 1. Navigate to the following key:

HKEY_CURRENT_USER\Software\Microsoft\Windows\CurrentVersion\Explorer

Tip: You can use this: How to jump to the desired registry key with one click

Step 3. Here, you will see a DWORD value named ScreenshotIndex, which stores the next screenshot’s index. If you look at my picture above, you’ll see that I took two screenshots, so the next will be the third one. Therefore, the ScreenshotIndex value is 3:

If you want to reset the counter – set this value to 1.

That’s it.


Note that if the folder already has a Screenshot (1).png file and you reset the counter, then do not expect the file to be replaced. Windows 8 checks for this file, and if necessary, it will adjust the screenshot index. In this case,  screenshot will be numbered as per the following rule:

  • You reset the screenshot index in the registry and you have files named Screenshot (1).png and Screenshot (2).png in the  %userprofile%\Pictures\Screenshots folder, then the next screenshot will be saved as Screenshot (3).png.
  • You reset the screenshot index in the registry and you have files named Screenshot (1).png and Screenshot (5).png files in the %userprofile%\Pictures\Screenshots folder, then the next screenshot will be saved as Screenshot (2).png.
  • You reset the screenshot index  in the registry and you have files named Screenshot (2).png and Screenshot (3).png in the %userprofile% \Pictures\Screenshots folder, then the next screenshot will be saved as Screenshot (1).png.

For those who prefer ready-made registry files:

Download ScreenshotIndex Reset Tweak


Enable advanced animations for the Start Screen in Windows 8

$
0
0

In Windows 8,  the Start screen is your primary way to launch applications. It replaces the good old Start menu and displays classic shortcuts and modern live tiles. Today, I am going to share hidden tweaks which allow you to enable more advanced Start screen animations. You can set it up so that you see the animation only when you logon to Windows 8, or you can also enable this each time the Start screen is showed.

Here are step-by-step instructions:

  1. Open Registry Editor (Press Win+R on the keyboard and type “regedit.exe” without quotes, press Enter key after all).
  2. Navigate to the
    HKEY_CURRENT_USER\Software\Microsoft\Windows\CurrentVersion\ImmersiveShell\Grid key.
    Tip: You can use this script: How to jump to the desired registry key with one click
  3. Right click in the right pane and create a new DWORD value called Launcher_SessionLoginAnimation_OnShow.  Set it to 1.
  4. Now press the Win (Windows-logo) key at your keyboard. Enjoy unlocked nice animation every time when you switch to the Start Screen.

A demo video:

The  Launcher_SessionLoginAnimation_OnShow  value set to 1 is what enables the animation each time the Start screen is shown. If you only wish to see the animation at logon, set this to 0.

UPDATE

There are more parameters. Thanks to MDL user Windows Fan for pointing me to them.

Launcher_SessionLogin_Icon_Offset defines the offset for user picture. The greater the value, the greater is the image’s right margin during animation.

Launcher_SessionLogin_IconText_Offset - same as above but for the user name.

Launcher_SessionLogin_IndividualTower_Offset produces the carousel view for tiles and defines the “far” distance of the circle

Launcher_SessionLogin_Tower_Offset defines the close distance.
For example, the following tweak with pre-defined values

[HKEY_CURRENT_USER\Software\Microsoft\Windows\CurrentVersion\ImmersiveShell\Grid]
"Launcher_SessionLoginAnimation_OnShow"=dword:00000001
"Launcher_SessionLogin_IndividualTower_Offset"=dword:00001388
"Launcher_SessionLogin_Tower_Offset"=dword:00001388
"Launcher_SessionLogin_IconText_Offset"=dword:000003e8
"Launcher_SessionLogin_Icon_Offset"=dword:000003e8

will cause the following animation effect:

For those who prefer ready-made registry files:

Download the Start screen animations registry tweak

How to unblock native “Pin to Start Screen” command for any file or object in Windows 8

$
0
0

As you may know, Windows 8 introduced а new feature that allows your to pin programs and folders to the Start screen. By default, this feature is limited only to executable files, shortcuts, management console (*.msc) and folders/libraries. Today I am going to share a simple registry tweak that enables you to pin any file to the Start screen.

Merge the following registry tweak and you are done:

Windows Registry Editor Version 5.00

[HKEY_CLASSES_ROOT\*\shell\pintostartscreen]
"MUIVerb"="@shell32.dll,-51201"
"NeverDefault"=""
"Description"="@shell32.dll,-51202"
"MultiSelectModel"="Single"

[HKEY_CLASSES_ROOT\*\shell\pintostartscreen\command]
"DelegateExecute"="{470C0EBD-5D73-4d58-9CED-E91E22E23282}"

That’s it. Now you can right click on any file and choose the “Pin To Start Screen” context menu item.


The result is following:

Download ready to use “Pin To Start Screen” registry tweak

How to skip Start Screen natively without using any third-party tool

$
0
0

Even before the official release of Windows 8, a number of tools had cropped up on the internet for skipping the Start Screen. We at Winaero ourselves offer you our Skip Mero Suite. But today, we are going to share a simple tweak that can natively boot Windows 8 to the desktop. Let’s start.

In short: We will install a system licensing policy which allow the OS to go to the Desktop directly after startup. After installing Windows 8, it is necessary to apply this policy. It is preferable that you apply this tweak before you activate Windows 8. If you have already activated, applying this tweak will require re-activation of the OS. Sounds a bit complex, doesn’t it? Don’t worry, I have prepared ready-to-use files that do all the dirty work for you. All you need is just a product key for your Windows 8, which you probably already have.

Here’s how to do it step-by-step:

1. Download this ZIP file from here.

2. Unpack all files into some folder, for example, into C:\NoMetro.

3. Right click on the ‘__wrapper.cmd’ file and choose “Edit”. Notepad will open that file.

4. Navigate to the fourth line and replace the “YOUR-WINDOWS8-SERIAL-NUMBER-HERE” part with your genuine product key for Windows 8.

5. Save the file and run Install.cmd

That’s it. Windows 8 will reboot automatically and will boot directly into Desktop mode from now on, at every boot. Enjoy!

In case you miss the Start Screen at logon, the “Undo-boot-to-desktop.reg” file is included. Just merge it by double clicking it, no other actions are required.

Bonus tip: You can disable the charms bar and switcher to make your Windows 8 less annoying in Desktop mode. Also check our AutoPin Controller  – it will help you to keep your Start Screen clean.

Download native skip metro package

Many thanks to our friends from MyDigitalLife forums for sharing this tip: @KNARZ, @moderate, @frwil and @ace2.

How to restore the good old Task Manager in Windows 8

$
0
0

Some users (including myself) are extremely pissed off with new “modern” task manager in Windows 8. Although some of its functions are not bad, like the “command line” column in the task list or performance graph, I don’t really need them. The old Task Manager provides a more consistent way of task management for me, it is familiar and the new one does not even remember the last active tab. So I am definitely one of those who want the good old, more usable Task Manager back in Windows 8. Let me show you how to do that with a few simple steps.

How to restore the good old Task Manager in Windows 8

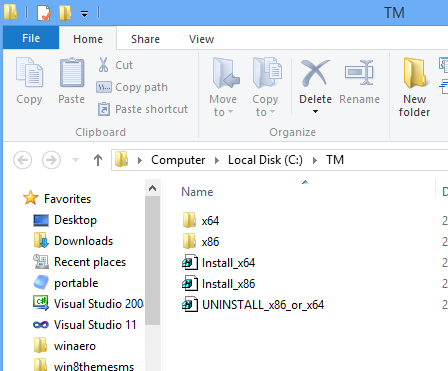
  1. Download the following ZIP file (containing classic Task Manager files from Windows 8′s boot.wim) and unpack the TM folder into the root of your system drive.
    You should get the following:
    How to restore old good Task Manager in Windows 8
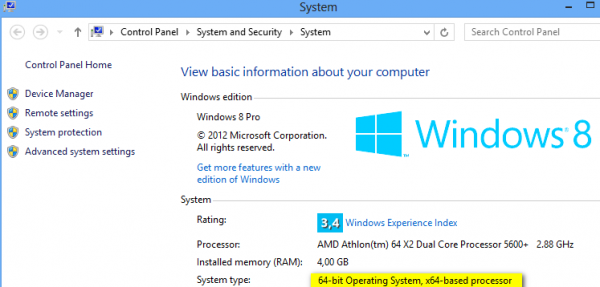
  2. Open System Properties and check which version of Windows 8 you are running – x86 and x64. Mine is x64:
    windows 8
  3. Double-click on the appropriate reg file . e.g. click on install_x64.reg file if you have Windows 8 x64 like me, otherwise click on the install_x86.reg file.
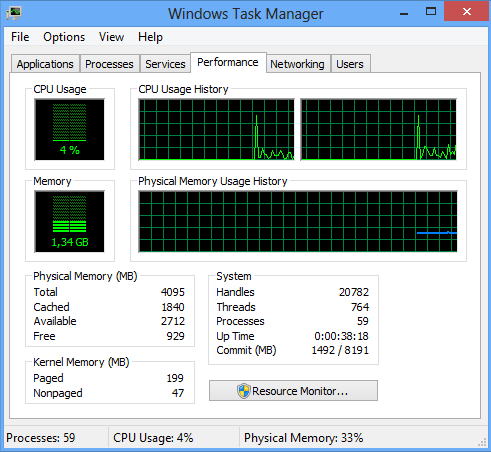
  4. That’s it! You don’t need to reboot, you don’t to do anything else. Just press the Ctrl+Shift+Esc keys on your keyboard and enjoy the return of your good old friend:
    old taskmgr on WIndows 8


Note: Import the UNINSTALL_x86_or_x64.reg file to restore the “new” Task Manager of Windows 8 back.
How does it work:

In the example above, I used the old, famous trick  with the “debugger” option. As you may or may not be knowing, you can specify a debugger application for every executable file in Windows. It is possible to set it via the following registry key:

HKEY_LOCAL_MACHINE\SOFTWARE\Microsoft\Windows NT\CurrentVersion\Image File Execution Options

Here you can see a list of executable files. It is possible to create the “debugger” option for every file shown in that list.

The “debugger” option usually contains the full path to the executable file which should act as the debugger. It will get the full path to the running executable file. We can use this to override the executable file of Task Manager.

I have extracted the genuine Taskmgr.exe and Taskmgr.exe.mui from the boot.wim file of Windows 8. But I can’t use them directly, because the files have the same names as the new Task Manager from Windows 8. Also, even though replacing them is possible, SFC /scannow will restore the “original” one when it runs. So the files must be renamed before I can set the old Task Manager as the debugger. That’s why the file is named “Tm.exe” file in the ZIP archive you downloaded above.

What do you think about the new Task Manager in Windows 8? Do you like it or do you still prefer the old one? Feel free to share your feedback in the comments.

How to disable Start Screen animations completely

$
0
0

Some time ago, we shared with you a simple tutorial on how to enable advanced animations for the Start Screen in Windows 8. But many people do not like any animation on the Start Screen because they prefer a fast and instantly responsive UI.  Today, we are going to share a very simple method to disable Start screen animations.

  1. Press Win+R keys on your keyboard. The “Run” dialog will be displayed.
  2. Type the following:
    SystemPropertiesAdvanced.exe
    Then press Enter.
  3. You will see the following window:
    advanced system properties
  4. Go to the “Advanced” tab and click on the “Settings” button in the “Performance” section. You will see the following window:
    performance options
  5. Uncheck the first check box “Animate controls and elements inside windows” as shown in the image above.

That’s all. That setting affects Start screen animations as well.

How to prevent Windows 8 from automatically logging in the last user

$
0
0

users list

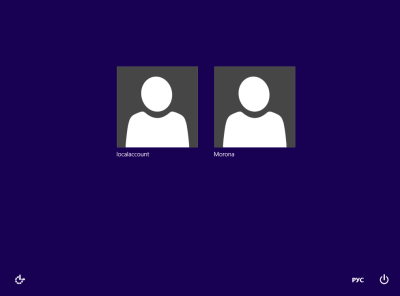
If you have multiple user accounts in Windows 8  (e.g. one for yourself and another for your family member), you may notice a new annoyance in Windows 8 – it signs in the last user automatically who shut down/rebooted the PC. Most users would not like to be signed in automatically and would instead prefer seeing a list of users at the logon screen, from where they can choose which user account to login in with. Today, we are going to share a simple tweak which will allow you to prevent Windows 8 from automatically signing in the last user. Let’s start.

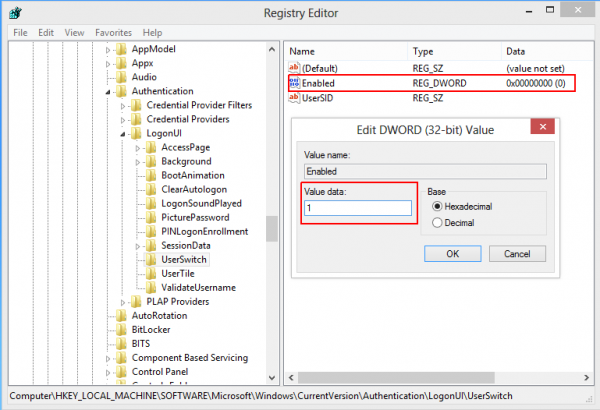
In Windows 8, the auto sign in process is controlled via the “Enabled” DWORD value at the following registry key:

HKEY_LOCAL_MACHINE\SOFTWARE\Microsoft\Windows\CurrentVersion\Authentication\LogonUI\UserSwitch

disable automatic log on of last user in Window 8

If the “Enabled” parameter is set to 1, you will get the list of users instead of the last user automatically getting signed in. A problem however is the behavior of the LogonUI.exe process which set the “Enabled” value to zero at every startup, even if you set it manually to 1. Why this behavior is introduced is not known.

So, the only way to prevent the “Enabled” value from being overwritten is to remove write permissions on it and set it to read-only.

Here are the steps to do just that.

First, make sure that you have disabled the automatic sign in option. Press Win+R keys on the keyboard and type the following:

netplwiz

Then press Enter.
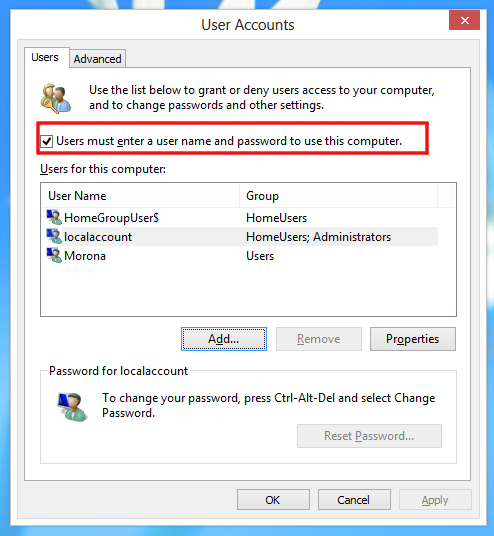
The following window will be displayed:

Check the option called “Users must enter a user name and password to use this computer”.

How to prevent Windows 8 from logging in automatically to the last logged-in user

  1. Download the following ZIP file and extract its contents anywhere you want.
  2. Right click on the DISABLE_automatic_sign_in.cmd file and choose the “Run as Administrator” menu item.
  3. That’s it! It will set all the necessary registry permissions and values. This will allow you to select the user account before log in.

How to restore defaults and undo this script

Right click on the RESTORE_automatic_sign_in.cmd file and choose the “Run as Administrator” menu item. This will restore the default Windows 8 behavior.

Click here to download ready-to-use scripts

How to disable Windows 8 boot logo, spinning icon and some other hidden settings

$
0
0

As you may know, there are some hidden option of boot manager available in Windows 8 which was discovered by our friend KNARZ. Today i want to explain which commands can be used to disable Windows 8 boot logo, disable spinning icon, enable advanced boot options and bring back “classic” Windows 7 boot experience to Windows 8.

Before you will start

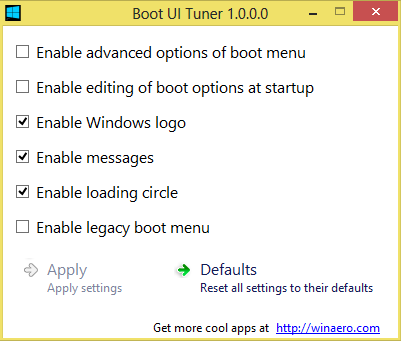
Note we have released freeware Boot UI Tuner.

Boot UI Tuner

Boot UI Tuner

All things that will be described below can be done via Boot UI Tuner. Also it has “restore defaults” button. Now you know it. Let’s continue.

Open elevated command prompt. You can done that by following simple steps

  1. press Win+X on your keyboard. You will see Win+X menu (power user menu) of Windows 8
  2. choose Command Prompt (Elevated) menu item.

How to disable Windows 8 boot logo

Type the following in command in elevated command prompt you have opened before:

bcdedit /set {globalsettings} custom:16000067 true

This will disable Windows 8 boot logo. You should reboot Windows 8 to see the changes. To enable it again/restore defaults, you should run one of the following commands:

bcdedit /set {globalsettings} custom:16000067 false
or
bcdedit /deletevalue {globalsettings} custom:16000067


How to disable spinning icon of Windows 8 boot manager

Type the following in command in elevated command prompt you have opened before:

bcdedit /set {globalsettings} custom:16000069 true

This will disable spinning icon during Windows 8 boot. You should reboot Windows 8 to see the changes. To enable it again/restore defaults, you should run one of the following commands:

bcdedit /set {globalsettings} custom:16000069 false

or

bcdedit /deletevalue {globalsettings} custom:16000069

How to disable Windows 8 boot messages

Type the following in command in elevated command prompt you have opened before:

bcdedit /set {globalsettings} custom:16000068 true

This will disable messages during Windows 8 boot, such as “Please wait”, “Updating registry – 10%” and so on. To enable it again/restore defaults, you should run one of the following commands:

bcdedit /set {globalsettings} custom:16000068 false
or
bcdedit /deletevalue {globalsettings} custom:16000068

How to enable advanced boot options of Windows 8

You can enable advanced boot options to be shown at every boot of Windows 8. They looks like this:

advanced boot options of Windows 8

advanced boot options of Windows 8

The following command will allow advanced boot settings to be shown at every boot:

bcdedit /set {globalsettings} advancedoptions true

Again, you should type it in elevated command prompt.

To disable it/restore defaults, you should run one of the following commands:

bcdedit /set {globalsettings} advancedoptions false
or
bcdedit /deletevalue {globalsettings} advancedoptions

How to enable editing the kernel parameters at startup of Windows 8

Type the following command in elevated command prompt:

bcdedit /set {globalsettings} optionsedit true

You will be able to specify an additional boot options for the Windows 8 kernel at boot time.

additional boot options for the Windows 8 kernel

additional boot options for the Windows 8 kernel

I guess most users will not find this option useful for everyday use. Note this option is not compatible with advanced options mentioned above.

To restore the defaults, type one of the following commands

bcdedit /set {globalsettings} optionsedit false
or
bcdedit /deletevalue {globalsettings} optionsedit

How to enable legacy boot menu for Windows 8

This option will bring back the boot experience of Windows 7 to Windows 8. You will be able to use old Windows boot manager instead of new one. Type the following in elevated command line:

bcdedit /set {default} bootmenupolicy legacy

The undo command is following:

bcdedit /set {default} bootmenupolicy standard

That’s it. I would like say thanks again to our friend KNARZ for sharing most part of this information. If you know more useful tricks related to Windows boot experience, feel free to share them in comments.


How to tweak the settings of the parallax effect on the Windows 8 Start Screen

$
0
0

Whenever you scroll the tiles on the Windows 8 Start screen, you will notice that there is a difference in the speed of the animation of the Tiles and the Start Screen’s background. The background scrolls slower than the tiles, giving the user a motion effect of a parallax. Today, I am going to share with you a hidden registry tweak which lets you customize the speed of the parallax effect in few simple steps.

Option one: Use our easy-to-use tool to tweak it
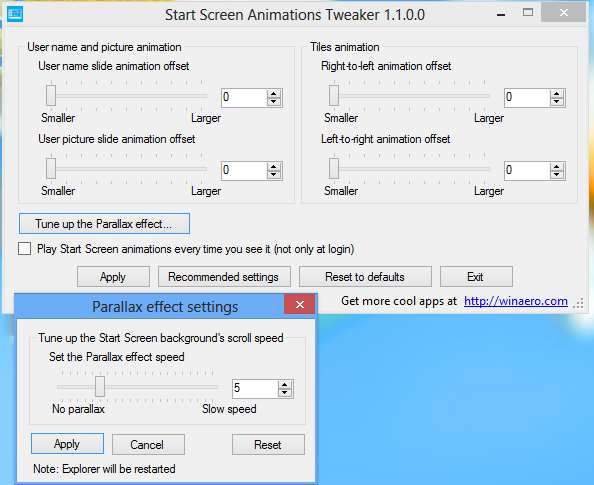
I have updated my Start Screen Animations Tweaker application to version 1.1. It now allows you to customize the hidden settings of the parallax effect.

start screen animations tweaker

You can greatly slow down the Start Screen background scroll speed. See this in action in the video below:

Download Start Screen Animations Tweaker

Option two: A manual registry tweak
The parallax effect speed is just one option in the registry. It is located at the following registry key:

HKEY_CURRENT_USER\Software\Microsoft\Windows\CurrentVersion\Explorer\VisualEffects\Accent

You can create the 32-bit DWORD value named “parallax“. The value does not exist by default, and Windows 8 considers it equal to 5.

If you set the “parallax” value to zero, the Parallax effect will be disabled, meaning the background will scroll at the same speed as the tiles. The greater the “parallax” value, the slower the background image scroll speed. For example, you can set it to “10″ to see a notable difference between the scrolling speed of the tiles and the background image.
parallax value in Registry

You have to log off and log back in to apply the changes. Or you can just restart Explorer via Task Manager.
restart explorer via taskmgr.exe

NOTE: If you want to restore the default speed of the parallax effect, just delete the DWORD value and restart Explorer.

That’s it.

A new way to display the Windows version on your desktop

$
0
0

Desktop Version windows 8

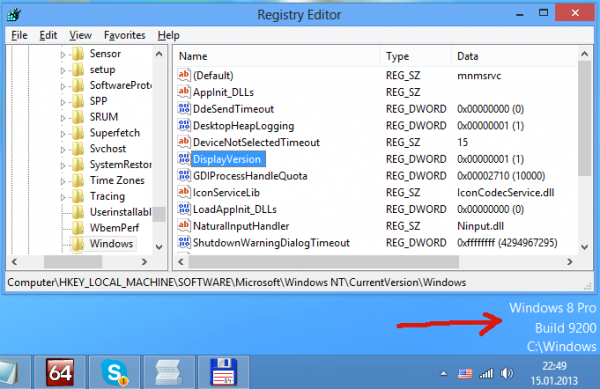
I have discovered a new hidden trick in Windows 8 which allows you to display the Windows 8 edition, build information and Windows folder right on your desktop, at a glance without opening System Properties.

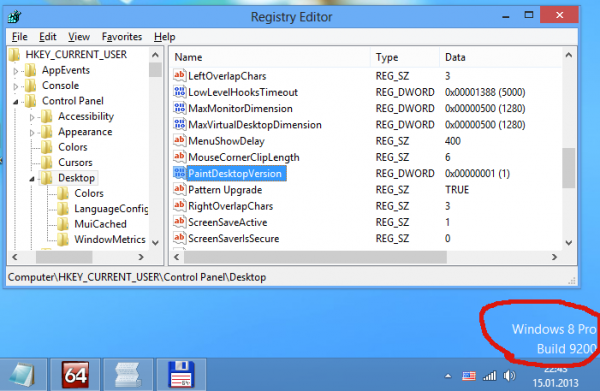
In previous versions of Windows, starting with Windows 95, one could add the PaintDesktopVersion DWORD value at the following registry key:

HKEY_CURRENT_USER\Control Panel\Desktop

In case you never heard about it until now, the following image shows what the old value does:

PaintDesktopVersion Windows 8

Windows 8 introduces yet another value, which overrides the PaintDesktopVersion value. It additionally displays your Windows installation directory below your Windows edition and build version.

This new DWORD value DisplayVersion is located at

HKEY_LOCAL_MACHINE\SOFTWARE\Microsoft\Windows NT\CurrentVersion\Windows

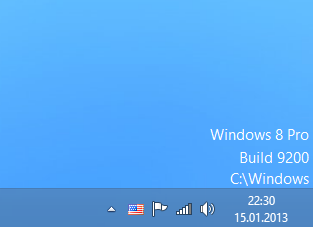
When it is set to 1, your Desktop will show the following information in the bottom right corner:

DesktopVersion In Action

For most users, the Windows directory shown will be C:\Windows.

I have no idea why Microsoft added another value, I guess they use it for debugging purposes.

You can download ready-to-use registry files from here:

Click here to download ready-to-use scripts

How to improve the way you close Modern (Metro) apps

$
0
0

Ever since I released “Close Threshold for Metro Apps“ utility for Windows 8, many people have been asking me how to make it easier to close Modern Apps without using third party software.

In case you are not familiar with Close Threshold for Metro Apps, it is a utility that simply adjusts the registry value for mouse as well as for touch screens so that the distance needed to close a Modern App by dragging it from the top edge of the screen can be reduced to whatever you want. You no longer have to drag it all the way to the bottom of the screen to close an app. It’s a significant improvement in usability, trust me.

Coming back to the manual way of accomplishing the same thing. because Windows RT-based devices are unable to run my utility as it does not have a version for ARM architecture.  Well, now they can use this simple registry tweak I am going to share.

How to make closing Modern (Metro) apps easier and faster

Step 1. Open regedit.exe and navigate to the following key:

HKEY_CURRENT_USER\Software\Microsoft\Windows\CurrentVersion\ImmersiveShell\Switcher

If that key does not exist, you must create it.

Step 2.  Create a new DWORD value named MouseCloseThreshold. It controls the drag-to-close distance for the mouse.

It’s value in decimals ranges from 1 to 1000.  The greater the value, the less you have to drag to close using the mouse. To change the value, double-click to edit it, change the Base to “Decimal” and then enter a value between 1 to 1000.

Note that a value of 0 disables it entirely. If you set MouseCloseThreshold to 0, you will not be able to close a Modern app by dragging the mouse.

Step 3. Create a new DWORD value named TouchCloseThreshold. As its name indicates, it controls the drag-to-close distance for the swipe gesture for touchscreen users.

This value also has the same range, from 1 to 1000 and must be set in decimals. The greater the value, the less distance you need to swipe to close an app.

If you set it to 0, you won’t be able to close a Modern app using the swipe gesture.

These are what I believe, the optimum values, or the preferences I use:

That’s it. You don’t even need to restart Explorer or log off for the changes to take effect – they will be applied instantly.

To reset all settings to their defaults, just delete the ‘MouseCloseThreshold’ and ‘TouchCloseThreshold’ values.

You can download ready-to-use registry tweaks below:

Click here to download ready-to-use registry files

How to pin any Modern (Metro) App to the Taskbar

$
0
0

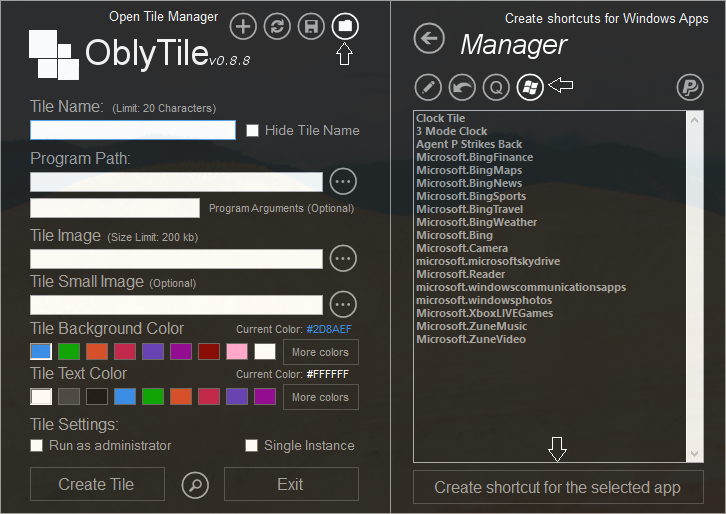
One of the most anticipated and highly desired features lacking in Windows 8 is the ability to pin Modern (Metro) apps to the taskbar. Microsoft did not make this possible out of the box. There have been a few articles written by various websites covering how to do this but they only deal with the built-in Modern Apps. The method didn’t work for additional  Store-installed apps.  Here’s how you can do it easily with the help of a free third party tool, called OblyTile. OblyTile is a little tool that allows you to do two things:

- OblyTile lets you pin a shortcut to anything you want on the Start screen with a custom image of your choice. Even Desktop apps can have a custom static tile image instead of just a regular icon.

- OblyTile includes a launcher lets you launch Modern (Metro) apps from anywhere on the Desktop. Modern (Metro) apps have an AppID, stored in their shortcut (the AppID concept was introduced in Windows 7).  OblyTile lets you create a shortcut to a Modern app on your desktop that you can move or pin anywhere like the Taskbar or inside your favorite Start Menu replacement.

Let’s start. Here are the step-by-step instructions.

1. Download and run OblyTile from http://win8tiles.com/Home/OblyTile

2. Click the ‘Open Tile Manager’ button in its top right corner.

3. In the ‘Manager’ section, click the ‘Create shortcuts for Windows Apps’ button (the button with the Windows logo).

OblyTile

Steps 2, 3 and 4 in OblyTile indicated by arrows

4. Select the App for which you want to create a shortcut on the Desktop and click the button below called “Create shortcut for the selected app”

5. The shortcut will be created on the Desktop. Give it an icon of your choice by right clicking it, Properties -> Change Icon.

6. Now right click the shortcut and click “Pin to Taskbar”.

That’s it. You have Metro Apps launchable directly from the Taskbar.

How to reduce the startup delay for desktop apps in Windows 8

$
0
0

In case you aren’t aware of this, Windows 8 delays the startup for all desktop apps. Shortcuts located in your Start Menu’s Startup folder as well as the items which run from various Registry locations will be launched after a delay of few seconds. This behavior was implemented by Microsoft probably because Windows 8 is a tablet-oriented OS (another example of how the Desktop takes a backseat in Windows 8). However, you can reduce this startup delay for desktop apps by editing the Registry. Read this post to learn how.

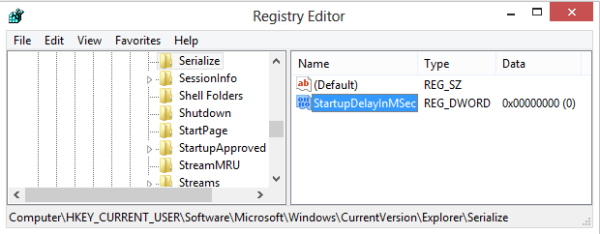
  1. Open Registry editor (regedit.exe) and navigate to the following key:HKEY_CURRENT_USER\Software\Microsoft\Windows\CurrentVersion\Explorer\Serialize

    If the “Serialize” key does not exist, then you should create it.

  2. Create a new DWORD parameter StartupDelayInMSec and set it to zero, as the screenshot indicates:

    registry editor

    registry editor

That’s all you need to do. Try putting something into your startup folder, e.g. File Explorer shortcut and reboot Windows 8 to see the change.

Bonus tip: Press Win+R on your keyboard, type shell:Startup and press Enter – the Startup folder will be opened.

Although it is not possible to completely eliminate the startup delay, with the help of this tweak you will get noticeably faster startup.

Click here to download ready-to-use registry files

Viewing all 3784 articles
Browse latest View live